搜索
返回
本篇文章我们一起来学习下如何用shader为模型添加素描效果。
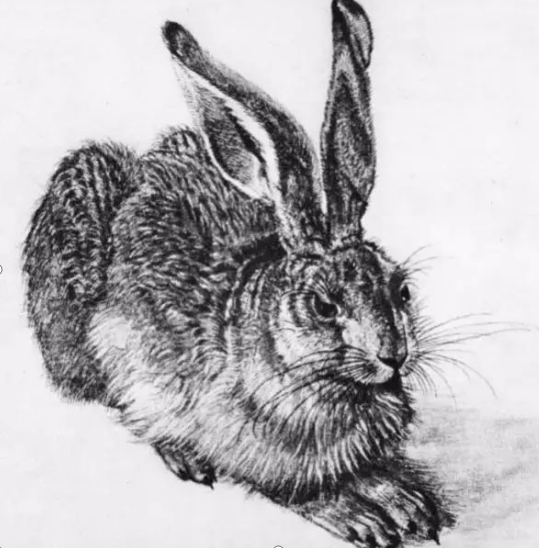
素描画(丢勒作品)
我们观察下素描画作,可以借鉴到素描风格模型的大致实现思路:事先我们要准备六张不同疏密程度、不同颜色深浅的素描贴图,根据模型表面情况,混合贴图比例到模型,实现模型素描化。

场景动物模型(素描效果处理)
我们先来看一下在Unity中对动物模型的shader代码处理过程:
Shader "Unlit/Sketch"
{
Properties
{
_Color("Color",Color) = (1,1,1,1)
_TileFactor("TileFactor", Range(0, 10)) = 1
_Hatch0("Hatch0",2D)="white"{}
_Hatch1("Hatch1",2D) = "white"{}
_Hatch2("Hatch2",2D) = "white"{}
_Hatch3("Hatch3",2D) = "white"{}
_Hatch4("Hatch4",2D) = "white"{}
_Hatch5("Hatch5",2D) = "white"{}
_OutlineFactor("OutlineFactor",Range(0.0,0.1))=0.01
}
SubShader
{
Tags{ "Queue" = "Transparent" }
Pass
{
Cull Front
ZWrite Off
Offset 1,1
CGPROGRAM
#include "UnityCG.cginc"
#pragma vertex vert
#pragma fragment frag
float _OutlineFactor;
struct v2f
{
float4 pos : SV_POSITION;
};
v2f vert(appdata_full v)
{
v2f o;
o.pos = UnityObjectToClipPos(v.vertex);
float3 vnormal = mul((float3x3)UNITY_MATRIX_IT_MV, v.normal);
float2 offset = TransformViewToProjection(vnormal.xy);
o.pos.xy += offset * _OutlineFactor;
return o;
}
fixed4 frag(v2f i) : SV_Target
{
return float4(0,0,0,1);
}
ENDCG
}
Pass
{
CGPROGRAM
#include "UnityCG.cginc"
#include "Lighting.cginc"
#include "AutoLight.cginc"
#pragma vertex vert
#pragma fragment frag
#pragma multi_compile_fwdbase
float4 _Color;
float _TileFactor;
sampler2D _Hatch0;
sampler2D _Hatch1;
sampler2D _Hatch2;
sampler2D _Hatch3;
sampler2D _Hatch4;
sampler2D _Hatch5;
struct v2f
{
float2 uv : TEXCOORD0;
float4 vertex : SV_POSITION;
float3 hatchWeights0:TEXCOORD1;
float3 hatchWeights1:TEXCOORD2;
SHADOW_COORDS(4)
float3 worldPos:TEXCOORD3;
};
v2f vert (appdata_full v)
{
v2f o;
o.vertex = UnityObjectToClipPos(v.vertex);
o.uv = v.texcoord* _TileFactor;
float3 worldLightDir = normalize(WorldSpaceLightDir(v.vertex));
float3 worldNormal = UnityObjectToWorldNormal(v.normal);
float diffuse = max(0, dot(worldLightDir, worldNormal));
o.worldPos = mul(unity_ObjectToWorld, v.vertex).xyz ;
o.hatchWeights0 = float3(0, 0, 0);
o.hatchWeights1 = float3(0, 0, 0);
float hatchFactor = diffuse * 7.0;
if (hatchFactor > 6.0) {
}
else if (hatchFactor > 5.0) {
o.hatchWeights0.x = hatchFactor - 5.0;
}
else if (hatchFactor > 4.0) {
o.hatchWeights0.x = hatchFactor - 4.0;
o.hatchWeights0.y = 1.0 - o.hatchWeights0.x;
}
else if (hatchFactor > 3.0) {
o.hatchWeights0.y = hatchFactor - 3.0;
o.hatchWeights0.z = 1.0 - o.hatchWeights0.y;
}
else if (hatchFactor > 2.0) {
o.hatchWeights0.z = hatchFactor - 2.0;
o.hatchWeights1.x = 1.0 - o.hatchWeights0.z;
}
else if (hatchFactor > 1.0) {
o.hatchWeights1.x = hatchFactor - 1.0;
o.hatchWeights1.y = 1.0 - o.hatchWeights1.x;
}
else {
o.hatchWeights1.y = hatchFactor;
o.hatchWeights1.z = 1.0 - o.hatchWeights1.y;
}
TRANSFER_SHADOW(o);
return o;
}
fixed4 frag (v2f i) : SV_Target
{
float4 hatchTex0 = tex2D(_Hatch0, i.uv) * i.hatchWeights0.x;
float4 hatchTex1 = tex2D(_Hatch1, i.uv) * i.hatchWeights0.y;
float4 hatchTex2 = tex2D(_Hatch2, i.uv) * i.hatchWeights0.z;
float4 hatchTex3 = tex2D(_Hatch3, i.uv) * i.hatchWeights1.x;
float4 hatchTex4 = tex2D(_Hatch4, i.uv) * i.hatchWeights1.y;
float4 hatchTex5 = tex2D(_Hatch5, i.uv) * i.hatchWeights1.z;
float4 whiteColor = float4(1, 1, 1, 1)*(1 - i.hatchWeights0.x - i.hatchWeights0.y - i.hatchWeights0.z - i.hatchWeights1.x - i.hatchWeights1.y - i.hatchWeights1.z);
float4 hatchColor = hatchTex0 + hatchTex1 + hatchTex2 + hatchTex3 + hatchTex4 + hatchTex5+ whiteColor;
UNITY_LIGHT_ATTENUATION(atten, i, i.worldPos);
return float4(hatchColor.rgb*_Color.rgb*atten, 1.0);
}
ENDCG
}
}
}
首先对模型进行描边操作,通过计算光源与物体表面漫反射值确定权重系数,从而确定贴图采集情况。
下面我们对逻辑进行拆分和解析:
描边逻辑:使用两个通道,其中一个通道沿法线方向挤出一点,输出形成描边的颜色
投影转换操作:将法线方向转换到最终投影阶段输出并进行偏移操作:
float3 vnormal = mul((float3x3)UNITY_MATRIX_IT_MV, v.normal);
float2 offset = TransformViewToProjection(vnormal.xy);
o.pos.xy += offset * _OutlineFactor;
计算模型表面漫反射:
float diffuse = max(0, dot(worldLightDir, worldNormal));
o.worldPos = mul(unity_ObjectToWorld, v.vertex).xyz ;
对漫反射结果与不同贴图特征进行混合操作:漫反射越暗,线条越密集
float hatchFactor = diffuse * 7.0;
if (hatchFactor > 6.0) {
}
else if (hatchFactor > 5.0) {
o.hatchWeights0.x = hatchFactor - 5.0;
}
else if (hatchFactor > 4.0) {
o.hatchWeights0.x = hatchFactor - 4.0;
o.hatchWeights0.y = 1.0 - o.hatchWeights0.x;
}
else if (hatchFactor > 3.0) {
o.hatchWeights0.y = hatchFactor - 3.0;
o.hatchWeights0.z = 1.0 - o.hatchWeights0.y;
}
else if (hatchFactor > 2.0) {
o.hatchWeights0.z = hatchFactor - 2.0;
o.hatchWeights1.x = 1.0 - o.hatchWeights0.z;
}
else if (hatchFactor > 1.0) {
o.hatchWeights1.x = hatchFactor - 1.0;
o.hatchWeights1.y = 1.0 - o.hatchWeights1.x;
}
else {
o.hatchWeights1.y = hatchFactor;
o.hatchWeights1.z = 1.0 - o.hatchWeights1.y;
}
混合白色基础颜色信息:漫反射深色部分权重越大,白色越少
float4 whiteColor = float4(1, 1, 1, 1)*(1 - i.hatchWeights0.x - i.hatchWeights0.y - i.hatchWeights0.z - i.hatchWeights1.x - i.hatchWeights1.y - i.hatchWeights1.z);
将所以颜色信息进行混合操作
float4 hatchColor = hatchTex0 + hatchTex1 + hatchTex2 + hatchTex3 + hatchTex4 + hatchTex5+ whiteColor;
叠加阴影效果
UNITY_LIGHT_ATTENUATION(atten, i, i.worldPos);
返回最终效果
return float4(hatchColor.rgb*_Color.rgb*atten, 1.0);
效果调整:
我们设置一个范围0-10的贴图平铺系数,修改系数处理贴图疏密程度
相关代码:o.uv = v.texcoord* _TileFactor;
调整平铺系数大小,实现线条稀疏密度的效果调整,如下图
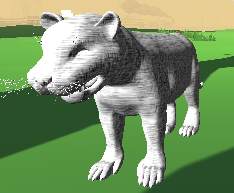
设置高密度线条
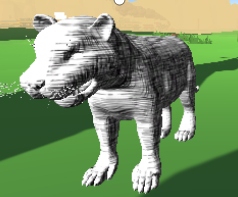
设置低密度线条
准备好六张素描纹理贴图,在顶点着色阶段计算逐顶点的漫反射光照,通过光照结果决定六张纹理混合权重,然后将数据传输到片元着色器,片元着色器再根据权重结果混合六张纹理的采样结果。